44b903573329ef724d9e8197930c2b0d5f28ff0428af3c28db

Moto G (2nd Gen) Goes on Sale Today For Rs. 12,999

Moto G (2nd Gen) Goes on Sale Today For Rs. 12,999

Xiaomi Mi 3 Specifications,Features And Price In India

Xiaomi Mi 3 Specifications,Features And Price In India

Apple iPhone 6 vs. iPhone 6 Plus: What's the difference?

Apple iPhone 6 vs. iPhone 6 Plus: What's the difference?

Oppo N1 Mini and Oppo R3 With 5-Inch Display, Snapdragon 400 SoC Launched

Oppo N1 Mini and Oppo R3 With 5-Inch Display, Snapdragon 400 SoC Launched

Samsung Launch E3 E5 A3 And A5 Series Phone

Samsung Launch E3 E5 A3 And A5 Series Phone

Showing posts with label Tech. Show all posts

Monday, September 10, 2012

Improve Your iPad YouTube Experience in 30 Seconds

Apple's iPad tablet (and other mobile devices) has always come with a YouTube app pre-included with and built-into iOS. Let's face it: It's bad. And here's how to improve your YouTube experience by getting rid of it (reversibly).
What I am about to tell you about is what you should do first just after getting your brand new iPad. If you are a new iPad user, here are a few reasons why there is so much hate for the YouTube app.

WHY PEOPLE HATE IT

  1. No video quality control: This is my biggest gripe with it. For some reason (probably because Apple promises that videos are "fun to watch" on the iPad), the app always plays videos in the highest quality possible. The first two iPad generations played video in 720p when available and I am guessing that the newest one plays them in 1080p when available. On slow connections, this is such a pain.
  2. Updates from Apple: Because it is a built-in app, it is Apple that seeds updates to it when they update iOS. The app can go months without a newer version while Google updates the YouTube website constantly, changing, adding and removing features. Many new features may not be available at all in the YouTube app.
  3. All YouTube links open in the app: If you click a YouTube link - anywhere - the YouTube app will open the video and start streaming it. Initially, it was possible to copy-paste the link into Safari and replace the "www" part with an "m" to go to the mobile website. This doesn't work in iOS 5. Unless you want to go manually to YouTube's tablet browser version and look up the video, you are forced to watch it in the Apple-managed app.

THE SOLUTION

The solution to Apple's badly-designed app is YouTube's tablet-optimized website! If you go to m.youtube.com in Safari, you get a nice, zippy, slick-looking and always up-to-date website that lets you control video quality (just HQ and not HQ, but at least it's there). Here's how to force every link to lead you to this website.
  • Open Settings and go to General > Restrictions.
  • Enable restrictions and set a simple passcode.
  • Enable restriction on YouTube.
Doing this will:
  • Hide the YouTube app from the Home Screen.
  • Redirect you to the mobile YouTube website whenever you want to watch a YouTube video a friend sent you.

Saturday, August 25, 2012

How to Download & Install Android 4.0.4 ICS Update on Galaxy Nexus GSM!

The Android 4.0.4 OTA update started rolling out to the GSM Galaxy Nexus.The official update is now available for download directly from Google. Getting it installed, on the other hand, is a bit of a task. We’ve done most of the legwork for you here, so follow the below instructions and you’ll be running 4.0.4 in no time.
Installing is simple, even if you’ve never done this sort of thing before – but you will need the proper Android ADB tools and drivers installed on your computer. Before you begin, click here to download the English GSM Galaxy Nexus update file, or check this XDA thread for localized versions in other languages or older updates.
you also should be running stock Android 4.0.2 (ICL53F) as opposed to a custom ROM, and you will of course need Android SDK installed.
DISCLAIMER: Zuketech will not responsible for any lose of data or damage to your device during or after this device. Proceed at your own risk.
How to Install Android 4.0.4 Ice Cream Sandwich on Galaxy Nexus (GSM):
Step 1- First Download fastboot [Windows or Mac]
Step 2- Then Unlock your bootloader. (Recommending this Article for Unlocking Bootloader)
Step 4- Copy Downloaded Android 4.0.4 update file to /sdcard folder on your Galaxy Nexus.
Step 5- Now enter your device into bootloader mode. (Turn off your device first, then hold Volume up + Volume Down + Power button.)
Step 6- Once device entered into bootloader mode, connect it with your computer, and open aCMD command prompt or terminal. Then Locate your fastboot folder, ensuring your ClockworkMod image is also inside that same folder.
Step 7- When you get into that folder, type below line in the command line.
fastboot-windows.exe boot recovery-clockwork-5.5.0.2-maguro.img 
Step 8- Now use the ClockWorkMod recovery menu to flash a zip file from the SD card, and choose the OTA zip file you downloaded earlier in step 3.
Step 9- Let the device do its work, and you will get into Android 4.0.4 ICS. Enjoy!
And that – as they say – is that. You can now enjoy Android 4.0.4 on your GSM Galaxy Nexus!

Friday, August 24, 2012

Digisol DG BA3370 3G 7.2 Mbps Dongle : Specification and Price


Digisol Introduced new DG-BA3370 high speed HSPA 3G  USB Dongle.Its Speed upto to 7.2 Mbps. Other Features of DG-BA3370 like text messaging (SMS), mass storage, phone book etc.Digisol DG-BA3370 Price in India at Rs 1649 INR

DG-BA3370 adapter has a MicroSD slot and can hold a MicroSD card up to 32GB for data storage. You can also store the downloaded data directly to the 3G USB adapter using a MicroSD card.

digisol3gdongle

DG-BA3370 adapter Plug  to a system and the driver installation wizard will execute automatically. There is no any additional hardware/software installation needed.Users have the flexiblity to import and export phonebook data and store up to 500 contacts.

Digisol DG BA3370 3G Dongle Specification :
  • Supports HSPA / UMTS (2100MHz), GSM / GPRS / EDGE
  • (850/900/1800/1900MHz)
  • Support HSDPA (7.2 Mbps), HSUPA (5.76 Mbps), UMTS (384 Kbps), EDGE (237 Kbps), GPRS (85.6 Kbps).
  • Supports SMS, phone book, volume statistics via software.
  • USB 2.0 High speed interface.
  • MicroSD slot for mass storage, maximum capacity up to 32GB.
  • No-CDROM required, auto installs the software.
  • Plug-and-play installation.

Digisol DG-BA3370 3G Dongle Price  : Rs 1649

Amazon Kindle Reader Now Available in India : Price at Rs 6,999


Amazon Kindle  Specifications : -

Display : 
Amazon's 6" diagonal most advanced E Ink display, optimized with proprietary waveform and font technology, 600 x 800 pixel resolution at 167 ppi, 16-level gray scale.

Size  :
6.5" x 4.5" x 0.34" (166 mm x 114 mm x 8.7 mm)

Weight :
5.98 ounces (170 grams)

System Requirements : 
None, because it's wireless and doesn't require a computer to download content.

On-device Storage : 
Up to 1,400 books or 2GB internal (approximately 1.25GB available for user content).

Cloud Storage :
Free cloud storage for all Amazon content.

Battery Life : 
A single charge lasts up to one month with wireless off based upon a half-hour of daily reading time. Keep wireless always on and it lasts for up to 3 weeks. Battery life will vary based on wireless usage, such as shopping the Kindle Store, web browsing, and downloading content.

Charge Time : 
Fully charges in approximately 3 hours via the included USB 2.0 cable connected to a computer. 

Wi-Fi Connectivity : 
Supports public and private Wi-Fi networks or hotspots that use the 802.11b, 802.11g, or 802.11n standard with support for WEP, WPA and WPA2 security using password authentication or Wi-Fi Protected Setup (WPS); does not connect to WPA and WPA2 secured networks using 802.1X authentication methods; does not support connecting to ad-hoc (or peer-to-peer) Wi-Fi networks.

USB Port : 
USB 2.0 (micro-B connector)

Content Formats Supported :
Kindle (AZW), TXT, PDF, unprotected MOBI, PRC natively; HTML, DOC, DOCX, JPEG, GIF, PNG, BMP through conversion.
Documentation Kindle User's Guide (pre-installed on device). Additional information in multiple languages available online.

Warranty and Service: 
1-year limited warranty and service included. Use of Kindle is subject to the terms found here.

Included in the Box : 
Kindle wireless e-reader, USB 2.0 cable. Power adapter sold separately.


 Price of Kindle E-Reader in India : Rs 6,999

Saturday, August 11, 2012

Winknet MF50 3G Pocket Wi-Fi Router Specification and Price in India Rs 5,800


Winknet has launched MF50 3G Pocket Wi-Fi Router in India.entrepreneurs and travelers who are always on the move that enables them easily stay connected through various access devices. It has HSPA USB Modem with a LCD display that displays status, signal strength and battery life.

Winknet-MF50-Pocket-Router-448x645

Winknet MF50 3G Pocket Wi-Fi Router Specification
 
  • Connects up to 10 devices simultaneously
  • HSPA 14.4 Mbps DL and 5.76Mbps UL speed
  • Weighs just 80 g
  • User-friendly web-based interface, easy installation and activation
  • Micro SD Card Slot (up to 32GB)
  • 1500mAh battery


Winknet MF50 3G Pocket Wi-Fi Router Price :

Winknet MF50 3G Pocket Wi-Fi Router Price in India : Rs 5800

Friday, August 3, 2012

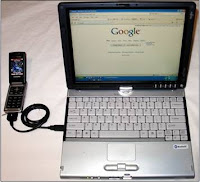
How to Connect Mobile GPRS TO Laptop / PC Via Bluetooth OR Data cable


Now Connect Your Mobile GPRS To your Laptop/Computer without any need of  Nokia Ovi Suite OR PC Studio Software  Via Bluetooth or Data cable.Laptop And Pc Setting For All Operator 

How to Connect Uninor, Airtel, Aircel, Tata Docomo, Reliance GSM, Vodafone, Vodafone, Stel, Virgin, T24, MTNL, BSNL, Idea, Videocon GPRS To PC

tethering-laptop-to-phone


Here give easy step For How to connect gprs to Your PC or Laptop Without nokia ovi Suite and Samsung PC Studio
How to connect the mobile phone with the PC/Laptop for Internet :-

1. Enable the Bluetooth in the laptop and phone simultaneously.

2. If you find your connection a bit slow or facing problems in opening the page then you have another option to connect the mobile phone to laptop/PC with USB cable.

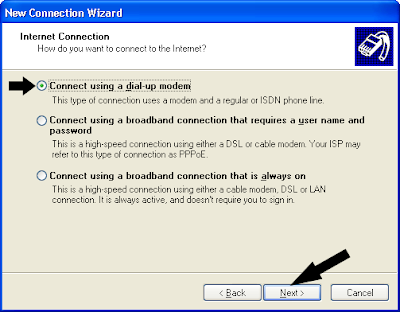
3. After pairing the devices you would need to click up the dial up network service and get connected to internet. The default dial up number is *99***1#.

This number works with certain GPRS services. If required put the correct ISP number and once the connection gets successful, you get the shortcut to desktop.

Please gather the GPRS settings for your specific Internet provider like Airtel,Reliance,Tata Docomo,Idea,Aircel,Videocon,Uninor,Vodafone,BSNL,MTNL before trying to make the connection to the internet through tethering. You can call service provider customer care also for getting more information regarding tethering as the default dialup number is different for different service providers.

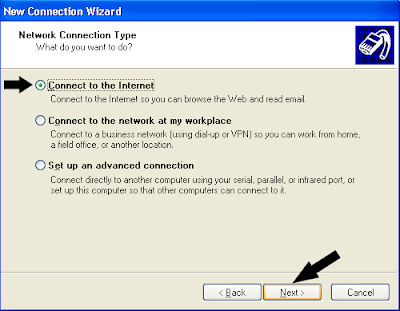
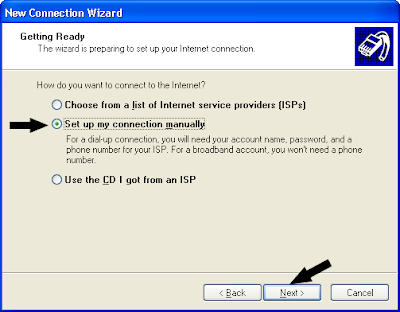
Please follow the below screenshots for help.

On PC, go to Control Panel (Start > Settings > Control panel > Network Connections) and click “Create New Connection”


PC-connect-steps-pc-phone1

tethering-settings-windows2


If CD is available with you then you can use that for all the installations.

tethering-windows-steps3

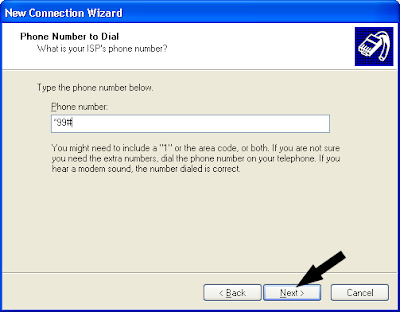
Enter the phone number as *99# or *99***1#, it depends upon the service provider. Please confirm this from customer care if you have any confusion.

tethering-phone-numbers-gprs5

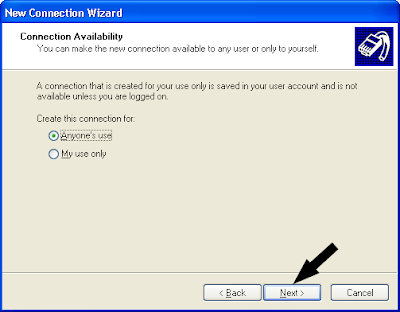
tethering-steps-airtel-mobile6

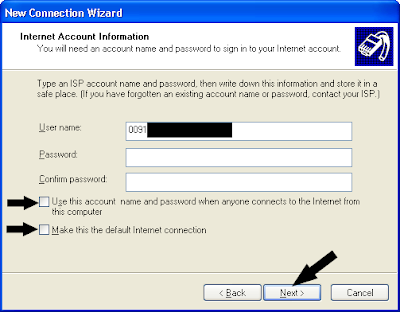
For User name give your mobile number with the country code. Never select the check boxes as they make this connection as default.

internet-settings-airtel-7


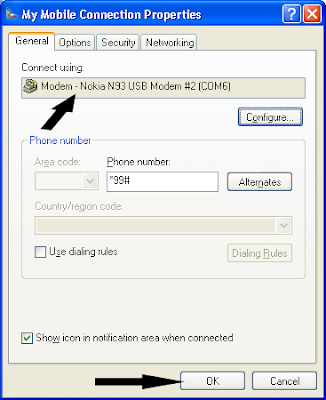
After you press finish.. You will find the new connection in you network connections. Just double click the connection and click the properties.

reliance-dialup-settings8

Make sure you have phone modem selected or checked (if more than one modem is installed

bsnl-gprs-settings9


Uninor Pc Setting, Airtel Pc Setting, Aircel Pc Setting, Tata Docomo Pc Setting, Reliance GSM Pc Setting, Vodafone Pc Setting, Vodafone Pc Setting, Stel Pc Setting, Virgin Pc Setting, T24 Laptop Setting, MTNL laptop Setting, BSNL Pc Setting, Idea Pc Setting, Videocon GPRS To PC setting

Wednesday, August 1, 2012

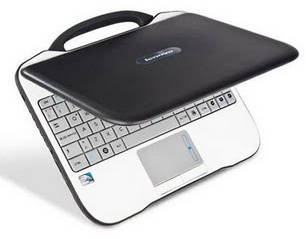
Lenovo Classmate+ PC and Convertible Specification,Features and Price in India


Lenovo Classmate Laptop + Tablet Specification is Intel Atom Processor N2600, optimised for ease of use and anywhere,anytime learning.Its Features is 10 inch screen,up to 10 hours battery life,Dual audio jacks and enhanced camera and lots more

lenovo-classmate

Lenovo Intel Classmate PC Specification :-


 Intel Atom processor 

  • up to 10 hours battery life
  • 10 inch screen and enhanced connectivity
  • Software Suite enables content creation and consumption
  • 70 cm drop resistant and 200 cc water resistant
  • Rugged DC jack, rubber feet and retractable handle
  • Enhanced security and theft deterrence
  • Enhanced educational features for collaborative learning
  • Includes educational software and utilities
  • Dual audio jacks and enhanced camera


Monday, June 18, 2012

Jailbreak iPod touch 3G / 2G MC Model on iOS 4.0 with JailbreakMe 2.0 Star

Most of you might have already know by now that an all-iOS device jailbreak called JailbreakMe 2.0 (Star) has been released. This new tool utilizes userland jailbreak vulnerability which enables it to jailbreak any iOS device on the latest firmware right from the Safari browse.

The following instructions, along with a how-to video guide will help you jailbreak your iPod touch 3G and iPod touch 2G MC Model on iOS 4 with JailbreakMe 2.0 (aka Star).

Step 1: Start iTunes and backup everything from Contacts, Calendars, Photos, Videos and Apps.

Step 2: Update your iPod touch 3G and iPod touch 2G MC model on the latest iOS 4.0 firmware with iTunes. Download links for the firmware and iTunes 9.2.1 can be found below.

Step 3: Once you are done with the update, make sure you are connected to a WiFi network.

Step 4: Open Safari on your iPod touch and navigate to http://jailbreakme.com.

Step 5: “Slide to Jailbreak” to begin the jailbreak process.
Jailbreak iPod touch JailbreakMe (1)
 Step 6: Wait till the jailbreak tool download the required files.. 
Jailbreak iPod touch JailbreakMe (3)
 Step 7: Once the download is completed, it will automatically start the jailbreak process. Just don’t do anything silly at this point. Wait till the jailbreak process is completed. 
Jailbreak iPod touch JailbreakMe (4)


Step 8: Once done, you will be greeted with the following message.
Jailbreak iPod touch JailbreakMe (2)
Step 9: Close the browser and look for Cydia. You should now have it on your phone!

Here is the video, showing all the above instructions in detail:
  
Download iTunes 9.2.1
Download iOS 4.0 for iPod touch